
The Inkscape community announces the release of Inkscape 0.91. Inkscape is an multi-platform, Open-Source Vector Graphics Editor that uses SVG as its native file format. Digital artists use it to produce professional quality work. Engineers and scientists use it to create clear drawings to explain their ideas. Everyday people use it to create simple drawings, develop their design skills, and just have fun. This new version features faster and more accurate rendering, new and improved tools, as well as better and wider file-format support.
Cairo rendering for display and PNG export
OpenMP multithreading for all filters
C++ code conversion
Major improvements in the Text tool
Measure tool
Type design features http://libregraphicsworld.org/blog/entry/inkscape-explores-type-design-gets-measure-tool , http://understandingfonts.com/blog/2011/11/typography-extensions-in-inkscape-0-49/
Symbol library and support for Visio stencils
Cross platform WMF and EMF import and export
Improved support for Corel DRAW documents, Visio importer
Support for real world document and page size units, e.g. millimeters
Numerous usability improvements
Native Windows 64-bit build
Bug fixes (see below)
Rendering and performance
Improved performance. The new renderer is significantly faster on most drawings. Renderings of the most complex objects are automatically cached to improve responsiveness during editing.
OpenMP multithreading for filters. Filters use all available processor cores for computation. This results in substantial speedups when editing drawings containing large filtered objects on multi-core systems.
Substantial memory savings. Inkscape now uses less memory when opening complex drawings, in some cases using only 25% of the memory used by Inkscape 0.48. Larger files can now be opened.
Responsiveness improvements. The rendering of the SVG drawing is now cached. This results in massive improvements in responsiveness of path highlights, object selection / deselection, and path editing in delayed update mode.
Rendering bug fixes. Most of the rendering glitches in our bug tracker are no longer present in Inkscape 0.91. The following things now render correctly:
Pattern fills (no more gaps between tiles, regardless of transformation)
Stroke of transformed objects in patterns
Patterns containing clipped objects
Nested clipping paths
Masked and clipped objects with large masks / clipping paths in Outline view
Paths with wide strokes and long miters
Fonts
Color display mode
A grayscale display color mode has been added, that shows a preview of your drawing in grayscale. Shift+numpad5 toggles the color display mode between normal and grayscale.
Tools
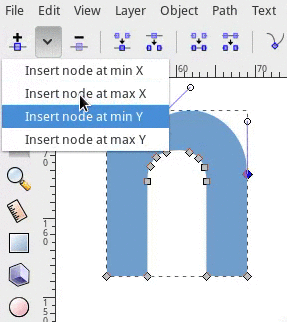
Node tool
The tool control bar for the Node Tool features a new dropdown to insert new nodes on the selected segments extreme values. For example, (as demonstrated in the image below) it is possible to add a new node at the highest point in a curve using Insert Node at Max Y
Measurement tool
The Measurement tool is a new feature for the artist to measure the elements in their drawing. To use the measurement tool, simply choose the tool, click anywhere on the drawing and drag the ruler out. The measurement tool will live-update with measurements of length and angles as you pass over objects in your drawing.
Text tool
Text size default unit is now points ( pt ) and is customizable ( px , pt , pc , mm , cm , in , em )
Text toolbar shows full list of font style variants for that font
Files with text in em units read correctly
Font substitution warning dialog
Gradients
Gradient toolbar enhanced to select and modify gradient stops, invert, repeat, and link gradients
On-canvas gradient editing fixes: double clicking to create stops, correct focus on select
Gradients sortable by color, name and usage in Fill/Stroke
Gradients can be renamed in Fill/Stroke
Dialogs, etc.
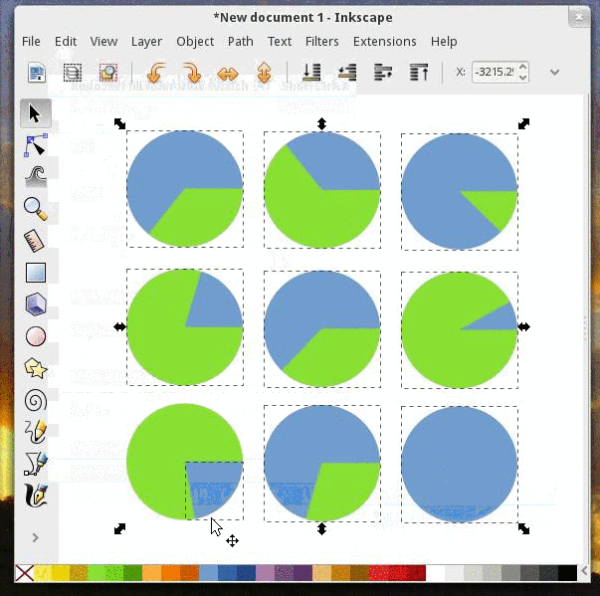
Arrange (was rows and columns)
NEW: renamed to ‘Arrange’
NEW: polar arrangement (separate tab) http://issuu.com/ddeclara/docs/inkscape_radial_arrangement
Align and Distribute
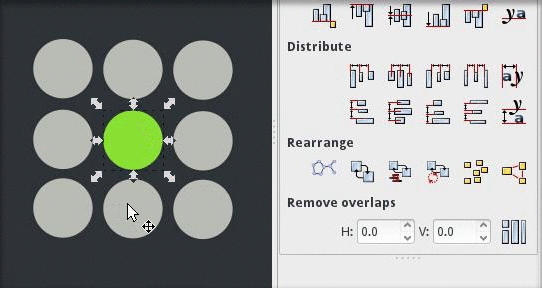
The new updated Inkscape features a new set of buttons in the Align and Distribute Dialog called Exchange position of selected objects . It adds the ability to exchange the positions of the objects that the artist has selected.
In the following example, three objects were selected, and their positions were exchaged with each other (using this new feature) according to their selection order.

There are also two other new buttons in the dialog that allow the artist to exchange the selected objects based on the stacking ( z-index ) order, or just exchange them clockwise based on the object’s position on the page.
Keyboard shortcuts ( Ctrl+Alt+Keypad numbers ) for align operations
Document Properties
Optionally disable antialiasing (bug #170356, interface partially implemented)
Find/Select
It is now easier to select items which are not at the top of the Z-order: use Alt+mouse wheel scroll to cycle through all items that are stacked on top of each other at the location of the mouse pointer (use Shift+Alt+mouse wheel scroll to add to the existing selection). At present, groups are not honoured, i.e., only individual items within groups are considered.
New Find/Replace dialog can operate on text or any attribute
“Select Same” is a new feature that allows an artist to select objects that have the same properties as the currently selected object. For example, you could select an object that has a fill of blue. Then, using the new feature select all other objects in the drawing with a fill set to that same shade of blue.
Layers
Drag and drop to reorder layers and create sublayers
Show/Hide All layers options in context menu
Symbols
Inkscape has a new Symbols dialog. The dialog displays symbols from a symbol library. Inkscape 0.91 includes five example libraries: logic symbols, AIGA/DOT transportation symbols, map symbols, flow chart shapes and word balloons. The dialog will also create a pseudo-library of all existing symbols in the current Inkscape drawing. (A symbol is defined by an SVG <symbol> element.) Symbols can be dragged from the dialog onto the Inkscape canvas.
Any document with symbols can serve as a source for a symbol library. Simply copy it to the symbols directory in your configuration directory (typically share/inkscape ). If proper care is taken, symbols can be provided with default fill and stroke colors that later can be overridden by the user.
Visio Stencil files ( .vss ) can also be used by dropping them in the same symbols directory. Results may not be as satisfactory as using SVG symbol libraries.
See the Symbols Dialog Wiki page for more details.
Text and Font
NEW: lists fonts used in the current document at the top
NEW: select all text objects with same font as current selection
NEW (to be verified): support list with fallback fonts (CSS2)
Transform
Rotation of objects clockwise or counterclockwise
Markers
Markers now take objects color
Trace Bitmap
Trace bitmap preview updates live and is resizeable
Live Path Effects
An object’s Live Path Effects are now forked upon object duplication.

PowerStroke
Here a list of the current state. Note that this is very much work in progress and anything can change . I think this is the most efficient place of keeping track how the powerstroke LPE works.
Stroke knots are purple diamonds
When first applied, 3 stroke knots are added: start, end, and somewhere in the middle along the path
Add nodes: Ctrl+click purple knot
Delete nodes: Ctrl+Alt+click purple knot
“sort points” reorders the stroke knots according to where they lie along the path (where they are closest to the path), instead of keeping them in original order.
Start and end caps can be specified. The SVG cap types are available, as well as an extra type, “Zero width”, that is identical to adding a width control knot at the start/end of the path with zero width.
Join type can be specified. In addition to the SVG join types, there are two new types:
Extrapolated arc : Mathematical explanation .
Spiro : rounds the join using a spiro curve (the rounded type rounds the curve using an elliptical arc).
Clone Original
The Clone original LPE ignores the path data of the path it has been applied to; instead, it copies the original-d path data , i.e. the path data before LPE calculation, from the path linked to by the Linked path parameter.
The Clone original LPE is made to be used in conjunction with powerstroke. Powerstroke creates a path with a variable stroke, but this path can then not be filled (because the fill is used as the stroke). To fill a powerstroked path, one must create a second path (dummy path), apply the Clone original LPE and link it to the powerstroked path. Because this second path clones the original path data before the Powerstroke LPE, it can be used to fill the powerstroked path.
To quickly create a dummy path and apply this effect, one can select the path to ‘clone’ and click the menu item Edit -> Clone -> Clone original path (LPE) .
Like for normal clones, pressing Shift+D , when the selected path has the Clone original LPE applied, selects the path referred to by the LPE.
Another very useful ability of the Clone original LPE is to create a clone with a different style than its referred path. To facilitate this, the LPE dialog will add the Clone original LPE when a clone is selected and the “+” button is pressed.
Filters
The new Custom predefined filters allow users to create predefined filters with custom parameters. See


Discussion about this post